It turns out there are some advantages with Dyslexia.
The Advantage
I recently came across this YouTube video.
It starts with how Dyslexic people can be better at identifying impossible shapes (like a Necker-Cube), but it turns out that there are a number of cases where dyslexic people are better at processing images as a whole; or containing scattered information; or interpreting information at the periphery of their vision.
And part of this is the trade-off from the relatively short period since humanity developed writing, compared with the relatively long period where a variety of visual abilities were more advantageous.
The interesting thing for me is that it made me think about why why my younger sister (who has some degree of Dyslexia) always used to beat me at card games, starting with Matching Pairs, even when we were really young. And this is perhaps a reason why.
Matching Pairs
I'd have a basic strategy for Matching Pairs, and I needed a strategy, because I couldn't remember the layout of the images when flipped over; nor the set of cards that had been flipped.
So, my strategy was that firstly, if I couldn't remember where two matching cards were (which was the normal case), then I'd randomly turn a card that I didn't think had been picked before (or recently). So, if it was familiar, I could guess at picking a matching card. However, if it wasn't familiar, I'd then try to pick another card that wasn't in the set of what I thought were recent cards, because then there's a better chance of picking a matching card.
The trouble was that even if the first card was familiar, I'd never know where the matching card was, I'd merely have a feeling about the general area. That meant I was wrong most of the time.
Reflecting on the way my memory works - which is visual, is somewhat like this:
Imagine in Matching pairs your whole visual field either contains a single card turned over, or there's a grid of unturned cards; or there are two turned cards and you can see how far one is away from the other, but not able to remember their absolute positions.
Then in the history of the game so far, you can flag up the areas where cards have been found, but each of those positions could contain any one of the cards seen so far. That's why it's challenging for me even though it's such a simple game.
For someone with Dyslexia, it could be an easier game, because they'd have a better sense of the whole playing area for the cards that have been turned over: rather like being able to visualise it in that state. Hence my sister was much better at playing the game than me.
ZX81 Version
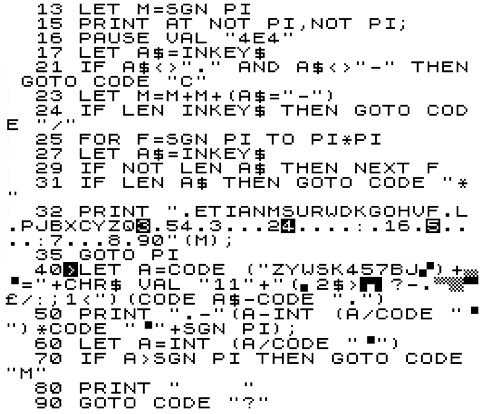
Because it's such a simple game, it didn't take me long to imagine how I'd write a version in BASIC for a ZX81. Here's the listing for it. You can play it yourself by going to the ZX81 Javascript emulator and typing in the listing below:
Note: In line 5, the 16 graphics characters are: <space><graphic 1>..<graphic 7><graphic Q>..<graphic Y><graphic space>.
Playing The Game
The game works as a two-player game. A grid of 6 x 6 (i.e. 36) tiles are generated, each of which contains 18, unique pairs of random 4x4 pixel patterns. They're initially shown all face-down with the digits 0..9, then A..Z in the top left-hand corner of each tile.
Player 1 then types one of these characters (e.g. '0') and that tile is turned over. Then Player 1 types another character (e.g. 'J') and its tile is turned over. If the tiles match, Player 1's score is incremented otherwise the tiles remain turned over for 2 seconds to give the user a chance to memorise them before being turned back.
Player 2 always has the next go and they choose the codes for two overturned tiles in sequence as per Player 1.
Play returns to player 1 and both players repeat the process. Over time, more and more pairs are found.
The game finishes when all the tiles have been matched. The player with the most overturned tiles wins (or if both have 9 pairs each, it's a draw).
This version of the game is good for exploring players' relative strengths. In particular, one of the differences between this game and a classical Matching Pairs game is that the patterns on each tile are abstract, because they're just a random arrangement of 4x4 pixels rather than familiar images. This makes it easier for people who can process abstract images more easily.
The Automatic Game
It's fairly easy to change the game so that the computer plays itself. In this version, the program selects a random character in the right range, as though it was typed and then the simulation plays out just as it would with human players. We don't need to pause at the end of every go where there's no match, but we do need to make sure that the computer doesn't try to pick the same tile twice, nor overturn tiles that are already matched: so we set matched pairs to '<space>' characters and build in an extra rule.
There are three things I really noted about the automatic game. Firstly, the ZX81 is terribly slow. Even though its effective reaction times are much faster than a human, I found it would take over 20 minutes to solve a game, about 3 or 4 times slower than a pair of humans.
Secondly, even though I consider myself to have a terrible memory for this kind of game, the automatic version shows that I do in fact remember the patterns much better than my personal algorithm described above implies: I would end up remembering the positions of several pairs while the computer was repeatedly choosing the wrong second tile for one I already knew. Some of this came from the sheer repetition of wrong moves by the computer, but it still demonstrated that I was in fact memorising locations even though I thought I didn't.
Thirdly, watching it was quite pleasantly calming and after several minutes I struggled to stay awake! Yay for boring programs as a cure for insomnia!
Program Analysis
I originally wanted the game to fit in 1kB, but that turned out not to be possible - at least I don't yet know how to squeeze it down. The two-player code itself is about 1124 bytes long if I remove the REM'd statements in lines 83 and 86, but include the extra automatic game checking in lines 125, 130, 203 and 206. To do this it has all the normal short-cuts like NOT PI (0), SGN PI (1), CODE "X" for some values in the range 10..255 and VAL "X" for others.
Generating Patterns
The first challenge with the game was to create the random set of patterns. I didn't store any fixed pictures, because the ZX81 has such terrible graphics anyway it hardly seemed worthwhile and also, it would take up memory I didn't want to waste.
So, instead I created 4x4 block patterns. The first issue then is how to create random patterns without duplicating them - the ZX81 is slow, so if I was checking each new pattern against all the previous ones, it would take O(n²) time, up to about 1000 checks. Instead what I did was simply generate a random number and then use the ZX81's 16-bit System Variable: SEED to generate the pattern directly, since every time it executes RND, SEED is updated, but it goes through all the 65536 binary values before repeating itself: hence I didn't need to check for repeats. I stored each 16-bit random pattern in a pair of 8-bit characters; so I needed an array of 18, 2-byte strings (M$) to do this.
The second challenge was to make sure I created proper pairs of values in a random order. To do this I first split the card generation into two levels: the 18 card patterns, which were 16-bits, and the cards themselves, which are indexes to those patterns and only need to be 8-bits.
For those, I adapted my card-shuffling algorithm. I essentially created a string containing a list of pairs of cards: AABB..RR (the first to 18th letter). Then I picked & removed a random card from the 'remaining' set of sorted cards; and placed it at the beginning of the string after the previous random cards. Then defined the remaining set as the set of following cards (which is just the n+1th card onwards after n cards have been picked).
This card shuffling algorithm guarantees that all the cards get shuffled, whereas a more literal algorithm would leave some pairs of cards still in order, if they didn't happen to be picked to be shuffled.
Displaying Tiles
I wanted to be able to display back-facing tiles without using any graphics characters used by tiles themselves and without spaces between, so I used ':'s for the main background and graphic characters between them. The routine for displaying tiles is a bit convoluted as it involves a loop for each row, but it saves on 3 different AT calculations. Perhaps, a single Print AT would have been better (and faster than the loop).
For the front side I didn't need to consider the display of the separators, because they've been displayed earlier. All I needed to do was display each row, which was fairly easy as each row is 8-pixels. So, I obtained the pattern from the tile in P$ indexed by the position (1..36). This gave me a two character M$ string, one character per row. Then I extracted each nibble and indexed that into the graphics patterns in C$.
The Y, X print AT calculations were common to both front and back facing tiles, so I factored that. None of this is fast, but it's fast enough for playing interactively.
A 1K Version
It always seems that I should be able to squeeze a ZX81 program into 1K, but perhaps the only way to do this here is to resort to machine code. The screen takes up about 20 chars per row x 21 rows + 4 = 424 bytes. The patterns and tiles take up 36 x 2 bytes = 72 bytes and the graphics take another 16 = 88 bytes.
This means the total space in BASIC is about 1124+424+88 = 1636, which means it ought to fit in a Timex Sinclair 1000 as it has 2kB instead of 1kB of RAM.
It might be shorter to compute patterns from scratch by resetting SEED each time. The ZX81 has about 800 or something bytes free, so this leaves about 300 bytes for the program - pretty tight, but at least it wouldn't take too long to write ;-) . And I could use things like the printer buffer for some extra space if needed.
Mini-Morse is a type-in 1K ZX81 program, but it's also a little treatise on encoding and Morse tutorials. Firstly, the listing which you can type in using an on-line ZX81 Emulator. Type POKE 16389,68 <Newline> New <Newline> to reduce the ZX81's memory to a proper 1K and then continue with the listing.
The Tutor
Then you can type RUN <Newline> to start it. It's really simple to use, just type a letter or digit and it'll convert the character to a morse code made of dots and dashes. Alternatively, type a sequence of '.'s (to the right of the 'M') and '-'s (Shift+J), fairly quickly and it'll translate your Morse code. In that case it's best to select the sequence you want and remember it, then type it out rather than trying to read and copy it. You'll find you'll pick up the technique fairly quickly. It only shows one letter at a time.
This is always the kind of Morse Tutor I would have wanted to use, even though it doesn't care about the relative lengths of the dots and dashes. That's because I want a low-barrier to entry and I don't want it to be too guided, with me having to progress from Level 1 to whatever they've prescribed. Also, the basics of Morse code is simple, so a program that handles it should be simple.
Encoding
So, here's the interesting bit. What's the easiest way to encode Morse? Here's the basic international set from the Wikipedia Morse Code entry:
The Puzzle with Morse code is that it's obvious that it's a kind of binary encoding, but at the same time it can't quite be, because many of the patterns have equivalent binary values. For example E= '.' = 0 = I = '..' = S = '...' = H = '....' = 5 = '.....'. Every pattern <=5 symbols will have at least one other letter or number with an equivalent binary value.
When people type in Morse they solve the problem by generating a third symbol - a timing gap between one letter and the next. And in tables of Morse code the same thing is done, at least one extra symbol is added - usually an extended space at the end of the symbol.
This implies that Morse can be encoded the same way on a computer, by encoding it as a set of variable-length strings (which involves the use of a terminating symbol or a length character), or encoding it in base 3 (so that a third symbol can be represented).
However, we should feel uneasy about this as an ideal, because everything about Morse code itself, still looks like it's in binary. Shouldn't it be possible to encode it as such?
The Trick
The answer is yes! And here's the trick. The key thing to observe when trying to convert Morse into pure binary is that every symbol is equivalent to another with an indefinite number of 0s prepended. As in my examples above, both E and H would be 0 in an 8-bit encoding: 00000000 and 00000000. So, all we have to do to force them to be different is to prevent the most significant digit from being part of an indefinite number of 0s, by prepending a 1. This splits the indefinite preceding 0s from the morse encoding. Then E and H become: 00000010 and 00010000. Of course, when it comes to displaying the symbols we'd begin after the first 1 digit. Another way of looking at it is to observe that the length is encoded by the number of 0s preceding the first '1' or the number of digits following the first '1', but the true insight is to grasp that this works for a variable-length morse-type encoding up to any number of dots and dashes.
You can persuade yourself that this works by trying it out on a number of Morse symbols above. An implication of this technique is that it means we know we can encode Morse in 1+the maximum sequence length bits. Here we only use basic letters and numbers so we only need 6 bits at most.
In the program above, Morse code uses that trick to encode using a pair of strings. K$ converts digits and letters into dots and dashes while M$ converts dots and dashes into digits and letters. I could have used just one string and searched through it to find the other mapping, but this is faster.
One thing else to note. M$ encodes dots and dashes as you might expect (e.g. 'E' is at M$(2), because E is now '10'. However, K$ encodes characters into Morse in reverse bit order, because it's easier to test and strip the bottom bit from a value in ZX BASIC, which lacks bitwise operators. The same trick works regardless of the bit order: appending a '1' (or '-') at the end of all the patterns and then '.'s to a fixed length encodes unique patterns for all characters.
Conclusion
Learning Morse code is tedious. It was great for communications in the 19th century when the world had nothing better than the ability to create a momentary, electrical spark from making or breaking a contact on a single wire, but the symbols are all fairly random and hard to learn. This is not to understate the amazing tech breakthroughs they needed (e.g. amplifiers and water-proofing cables!).
I've wanted to write a simple Morse tutor for a while and a 1K ZX81 seems a natural platform for such a simple exercise. Plus, the Morse to character translation is a bit real-time and I really wanted to pass on the encoding trick. MiniMorse takes me full circle to a hack of mine in 2010 which created a morse-code type encoding for a POV display based on the layout of a phone keypad. Check out Hackaday's entry for PhorseCode or my Google Site web page for it. PhorseCode could be converted to a proper Morse Code system using a different translation table.
Postscript
It is, of course, possible to reduce the memory size of MiniMorse. Here's a version that's only a mere 405 bytes long, with just 32b of variables. I could reduce it a bit further by combining M and A as they're never used at the same time. Ironically, many of the space-saving techniques on the ZX81 make the program appear bigger. This is due to the fact that literal numbers incur a 6 byte overhead as the internal representation + prefix of CHR$ 114 gets inserted into the code. By employing tricks such as NOT PI for 0, SGN PI for 1, INT PI for 3; CODE "char" for any number in the range 2, 4 to 63 or 128 to 191; VAL "number" we can save bytes by preventing the internal representation from being used. Caching very frequently used values as variables can sometimes also save memory. Finally, the biggest difference was made by evaluating the K$ and M$ strings directly in the code, which saved over 128b because they're no longer duplicated in the variables region.
And there are yet more improvements. It's possible to replace a GOTO CODE [CHR$ 13] with GOTO PI; and string$<>"" with LEN string$; string$="" with NOT LEN string$; CODE [CHR$ 10] with PI*PI and finally we only need 4 spaces and no ';' on the print statement at the end. This takes it down to 393 bytes!
Mini-Morse ZX80
It's possible to write a variant of MiniMorse for the 1K ZX80. We need to do this in two parts. Strings can't be indexed on a ZX80; we can't type all the printable characters (can't type inverse characters); and some characters are remapped if you type them (e.g. PRINT CHR$(18), CODE("-") displays '-' then 220. You can find the character set near the end of the user manual at this URL.
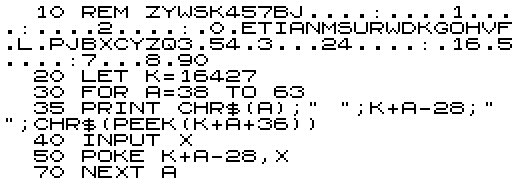
So, instead we put the conversions in a REM statement and PEEK them. Programs start at 16424 and the first character of a REM statement is at 16427. So, the first stage is to enter all the Morse codes we can't easily enter (i.e. the letters).
RUN the program and type the values on the second row:
A.B. C. D E F. G. H. I J. K. L. M.N O. P. Q. R. S T U. V. W X. Y. Z
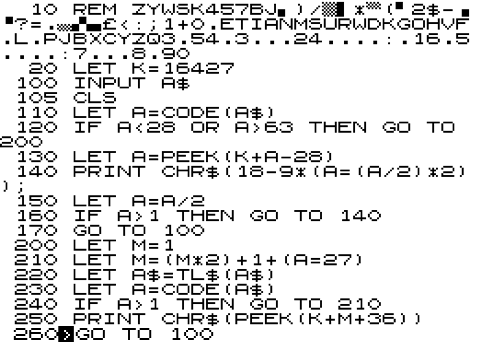
After it has run, check the REM statement matches the first line of the final program. When it does, delete lines 30 to 70 and complete the rest of the program as shown below:
MiniMorse for the ZX80 works slightly differently, because you have to press <Newline> after typing in the letter or Morse pattern you want to convert: the ZX80 doesn't support INKEY$. The easiest way to escape the program is by typing in 0 and then pressing <Space> immediately after pressing <Newline>.
In my previous blog-post I described a coding convention for the Intel 8048 and used an embedded implementation of the Towers of Hanoi program as an example. It had a rudimentary user interface; outputting merely the column numbers between each step, which advanced on a button press.
Towers of Hanoi is an interesting toy program, and here we explore a different implementation, targeted at a 1K ZX81.
A standard ZX81 has 8K of built-in ROM + 1K of RAM which is shared between the user program (+variables); the 8K ROM's system variables; the 32x24 screen (which expands from 25 bytes to 793 bytes depending on how much is displayed on it); the 33b printer buffer and the machine stack used by the ROM. All this is described in Chapter 27 of the user manual.
So, in some respects it has less usable memory than an Intel 8048 (because 1K + 64b > 1K-system variables-screen...), but in others it has more (because the ROM is useful library code that would have to be included in the Intel 8048 equivalent). In addition, BASIC is generally less compact than assembler (and ZX81 BASIC is even worse).
The Listing
It doesn't look like there's much here, but a surprising amount thought went into it. You can run a javascript version of a zx81 from here, but many other emulators are available. To prove it will work in 1K, you will need to type POKE 16389,68 [Newline] NEW [Newline] to set the RAMTOP top of BASIC to the end of memory on a 1kB ZX81.
It's not obvious how to type the graphics, but the top line is 2 spaces, then ▗ █ ▙ 6 spaces Graphic Shift 5, 6 spaces Graphic Shift 8. The rest can be deduced fairly easily then.
The application will use 634 bytes. An earlier version used a mere 41 bytes more and this was enough to cause an out of memory error.
Using The Screen
The most significant change to the ZX81 version is to use the screen to provide a graphical representation of the puzzle. Because we still need to save space, it's essential to use the ZX81 block graphics (rather than whole characters) and I chose to move a ring by unplotting a ring's old position while plotting its new position rather than, e.g. animating the movement (which would have been very slow on the ZX81 anyway).
In the first version I used loops and plot commands to generate the puzzle, but it uses less memory to print the puzzle out directly. I could save another 4 bytes by assigning the graphics for the spaces and the poles to R$ and substituting R$ at the end of lines 10 to 30.
I also save a bit of space by calculating the minimum pole spacing. It looks like there isn't enough room between poles, but this isn't correct, because at maximum we only ever need space for a 7 pixel wide ring and a 6 pixel wide ring. Therefore 7+1+6+1=15 pixels is enough between the poles.
This means the graphics take up: (8+15+15+7)/2=23 chars for row 4, 22 chars for row 3; 21 chars for row 2 and 20 chars for row 1(because the end of the higher rows are only ever filled with shorter rings). That's 86 bytes in total. The Column->Column moves are also displayed and this takes 4 bytes.
Moving The Rings
This is relatively simple: we have a string, R$, which is used as a byte array (to save space) to hold the number of occupied rings on each column. The width of each ring to move is determined by the current level: 1 for level 0 up to 7 for level 6. S and D determine the start and end coordinate. We plot to the ring we move to, while unplotting the ring we move from except for when x=0 in order to leave the pole. At the end we adjust the number of occupied rings, -1 for the source ring and +1 for the destination ring.
Memory-Saving Techniques
This program uses the normal ZX81 BASIC memory saving techniques. '0', '1' and '3' are replaced by NOT PI, SGN PI and INT PI to save 5 bytes each time. Values in the printable character range are replaced by CODE "x", saving 3 or 4 bytes each time; while other values use VAL "nnn" to save 3 bytes each time. This also applies to line numbers, so that placing the Hanoi function itself below line 1000 saves several bytes.
Using R$ as a byte array involves a number of clumsy VAL, CODE and CHR$ conversions, but replacing R$ with a DIM R(D) array would end up costing another 9 bytes, so it's a net saving to use R$.
Hanoi Algorithm Change
It turns out we can make the Hanoi algorithm itself less recursive than in the Intel 8048 version. In that version we pushed the source and destination columns on each call, but in fact that was done to demonstrate how to manage the data structure.
It's not necessary to do that. The original source and destination values can be restored after each recursive call, because 6-S-D is a reversible operation. Similarly, because L is decremented at the beginning of each call (instead of passing L-1 as a parameter to each call), then by incrementing it at the end of the function, it too, doesn't need to be saved.
Conclusion
The constraints and capabilities of running Hanoi on a different platform and language present challenges and opportunities which this ZX81 implementation amply demonstrates, not in the least by the 4:30 minutes of patience needed to fully run it for 7 rings (vs <1s for the Intel 8048 version). Finally, this implementation circumvents the ZX81 BASIC's lack of support for stack data structures to reduce the amount of recursive memory needed, which begs the question: how much recursion is really needed to implement the algorithm?
Both the ZX80 and ZX81 support 8x8 pixel character-only displays and contain 16 graphic characters that can be used to plot fat 4x4 pixel pixels on a two-by-two grid within each character:
These are called Battenberg graphics after the cake of the same name 😀
On a ZX81 it's easy to use these characters to plot (crude) graphics on the screen, the computer provides a PLOT x,y and UNPLOT x,y for this purpose. But with half the ROM on a ZX80, it's much harder - so I wondered, how much harder is it to plot pixels? It turns out it's pretty formidable!
Challenges
The ZX80 doesn't have any PLOT or UNPLOT commands.
The screen on a ZX80 is like that on a ZX81, when you run a program, the screen first collapses to a minimum of 25 newline characters and expands as you display text. However, on a ZX80, unlike the ZX81, you can't print anywhere on the screen as there's no PRINT AT function, this means we'll have to poke onto the screen.
The memory map on a ZX81 has the display immediately after the program, but on a ZX80, the display comes after the variables and the editing workspace which means that it'll move around just by creating a new variable or possibly by performing input (which is a potential problem).
Ideally, to convert from pixel coordinates to Battenberg graphics you'd want to map the odd and even x and y coordinates to successive bit positions to index the character.
But, unlike the ZX81, the character set on a ZX80 doesn't have the characters in the right order to display Battenberg characters. Instead they contain gaps; the last 8 codes are generated from the first 8 but in reverse order; and some of the first 8 are taken from what ought to be the inverse characters!
The Solution
The solution really comes in a few parts. Firstly, the easiest way to be able to map an ideal pixel value to its Battenberg character is to create a table in RAM, by putting them into a REM statement (the ZX80 has no READ and DATA commands so it's hard to put a table of data into an array, but the first REM statement in a program is at a fixed location). However, even this presents a problem, because only 8 of the graphics characters can be typed. The easiest way to handle that is to write a program which converts a different representation of the characters into the correct ones.
So, on the ZX80, first type this:
After you run it, you'll get this:
Even this was tricky; I had to use character codes above 32, since symbols such as +, -, /, ", etc get translated into keyword codes for the Basic interpreter. The above program illustrates an interesting feature of ZX80 Basic that differs from ZX81 and ZX Spectrum Basic in that AND and OR operations are actually bitwise operations rather than short-circuit boolean operations. Thus P AND 15 masks in only the bottom 4 bits.
Once we have generated the symbols we can delete lines 10 to 30.
The next step is to actually write the code to generate pixels and plot them. Once we know how, it's actually a bit simpler. Firstly, we fill out the screen with spaces (or in my case, with '.'):
This gives us 20, full lines of characters. Because it's going to be difficult to plot a pixel by reading the screen, figuring out the plotted pixels then incorporating the new pixel; I cache a single character in the variable P and its location in the variable L. All my variables a single letters to save space if you try to run it on a 1Kb ZX80. The idea is that if the new print location in L changes, we reset P back to 0, otherwise we incorporate the new pixel.
Next we start the loop and calculations for plotting, in this case a parabola. We loop X=0 to 63 and calculate Y on each loop (it's a parabola that starts at the bottom of the screen):
Finally we perform the pixel plotting and loop round.
This involves saving the previous location in K so we can compare it later; then calculating the new location based on X and Y (since each character position is 2 pixels, we need to divide X and Y by 2 and since there are 32 visible characters and an invisible NEWLINE character on every screen line we must multiply Y/2 by 33). Note, a quirk of ZX80 Basic means that multiplies happen before divides, so Y/2*33 would calculate Y/66!
The pixel bit calculation in line 50 makes use of ZX80 bitwise operators, we want to generate 1 if X=0 (so 1+(X AND 1) will generate either 1 or 2) and then we need to multiply that by the effect of the Y coordinate, which is 1 on the top line, and 4 on the bottom: 1+(Y AND 1)*3 will do that. Hence this will generate the values 1, 2, 4, 8 depending on bit 0 of X, Y.
We must POKE the location L plus an offset of 1 (because the first character of the display is a NEWLINE) and also we must add the location of the display file (it turns out that these calculations don't make the display file move around). We poke it with the pixel value we want indexed into the right character code from the REM statement. Finally we loop round X.
This code generates this graph:
It looks reasonable even though it's generated with integer arithmetic. It's the first pixel plotted graph I've ever seen on a ZX80!
More Examples
My original reason for doing this was to see if I could generate sine waves using a simple method I once found for a Jupiter Ace. Here's the program and the result:
It looks fairly convincing, especially as it's all done with integer arithmetic. Because the code generates both the sine and cosine value, it's easy to turn this into a circle drawing program which produces the following:
It looks a bit odd, that's because the algorithm doesn't quite generate sine and cosine curves. What it's really doing is computing a rotation matrix, but only one of the terms is computed for sine and cosine each time. Hence, the circle looks a bit like an oval with a slight eccentricity.
My graph drawing algorithm has one very serious limitation. Because it doesn't read the screen in order to compute a new pixel, if the graph goes over the same part of the screen twice, the second pass will muck up what was there before. Doing the correct calculations is possible using some table lookups and bitwise operations, though it would slow down the graph generation. I didn't bother, because I only wanted to generate simple graphs.
Conclusion
The ZX80 and ZX81 have very similar hardware, but a number of design decisions in the ZX80's firmware made drawing circles much harder than you might expect. With a lot of effort it is possible to generate some simple graphs 😀